What is a webhook endpoint? Definition, example, and code
A webhook endpoint is the URL on your server that receives events from Stripe or GitHub. See a real request, the signature check, and the retry pattern.
What is a webhook endpoint?
A webhook endpoint is an HTTPS URL on your server that another service calls when an event occurs. The provider sends an HTTP POST carrying the event as JSON. Your endpoint verifies the signature, returns a 2xx status, then processes the event. It replaces polling: instead of asking an API whether anything changed, you are told the moment it does.
Webhooks invert the direction of a normal integration. In the pull model, your code polls an API and keeps asking whether anything changed. In the push model, the service sends each event to you as it happens. The webhook endpoint is the URL that receives the push.
If you've integrated Stripe, GitHub, or an email platform like Nuntly, you've already seen webhooks from the consumer side. Building the receiving side is a different job, and it starts with knowing what you actually configure.
What a webhook endpoint is made of
The endpoint is one piece of a larger setup. When you register a webhook with a provider like Stripe, GitHub, or Nuntly, you configure four things:
- Endpoint URL. The HTTPS route on your server that receives the events. This is the webhook endpoint itself, the part you build and host.
- Subscribed events. The event types you want to receive, sometimes called topics. You pick the ones your application reacts to instead of receiving everything, for example
email.deliveredandemail.bounced. - Signing secret. A shared secret the provider issues so you can verify each incoming request is genuine. You store it and never expose it.
- Status. Whether the webhook is enabled or paused, so you can stop delivery temporarily without deleting the configuration.
The provider owns the events and the signing. You own the endpoint URL and everything that happens after a request arrives.
The two terms get used loosely, so it helps to pin them down. The webhook is the whole arrangement, provider side included. The webhook endpoint is the URL and handler on your side that receive the events. You configure a webhook; you build and host its endpoint.
Webhook vs API endpoint
A webhook endpoint and an API endpoint are both URLs that accept HTTP requests. The difference is who calls whom. With an API endpoint, your application is the caller: you send a request to the provider and wait for a response. With a webhook endpoint, the roles flip: the provider calls a URL that you host, and your application is the one responding.
That inversion is why webhooks are sometimes called "reverse APIs". It also explains the operational differences:
| API endpoint (you call them) | Webhook endpoint (they call you) | |
|---|---|---|
| Direction | Outbound request from your app | Inbound request to your app |
| Timing | Whenever you decide | Whenever the event happens |
| Authentication | You send an API key or token | You verify a signature they send |
| Latency | Poll interval (seconds to minutes) | Near real time |
| Wasted work | Most polls return nothing new | One request per event, nothing wasted |
| Failure mode | Your retry logic | Their retry logic, your idempotency logic |
Polling an API for status changes works at small scale, but the cost grows with volume: most requests return no new data, and you burn through rate limits checking for events that haven't happened. A webhook endpoint receives one request per event instead. For a deeper look at this trade-off applied to email delivery, see email webhooks: real-time event tracking.
What is a webhook URL?
A webhook URL is the address of your webhook endpoint: the HTTPS route you hand to the provider so it knows where to send events. The two terms are used interchangeably in most documentation. Strictly, the URL is the address and the endpoint is that address plus the handler behind it.
One thing the URL is not is a security control. A long, random, hard-to-guess path buys you nothing on its own: URLs leak through server logs, proxies, browser history and error trackers, and anyone holding yours can POST whatever they like to it. Secrecy of the address is not authentication. The signature is what proves a request genuinely came from the provider, which is why the securing your webhook endpoint section treats verification as mandatory rather than a hardening step you get to skip.
Webhook endpoint example: the anatomy of a real request
Every webhook delivery is an ordinary HTTP request with four moving parts: the URL it arrives at, the POST method, the JSON payload, and the signature headers. Here is a real one from Nuntly:
POST /api/webhooks/nuntly HTTP/1.1Host: yourapp.comContent-Type: application/jsonwebhook-timestamp: 1784193600000webhook-signature: t=1784193600,v0=5f8a2b1c9d3e...{"id": "evt_9f3c2a1b8e7d","createdAt": "2026-07-16T09:20:00.000Z","type": "email.delivered","data": {"id": "em_1a2b3c4d"}}
Breaking those four down, plus the one detail inside the payload that trips people up:
The URL. A webhook endpoint URL is a route you own, served over HTTPS, reachable from the public internet. Something like https://yourapp.com/api/webhooks/nuntly.
The method. Webhook deliveries are POST requests. The event data travels in the request body, not in query parameters.
The payload. A JSON document describing the event. The shape varies by provider, but most follow the same pattern: a root id and createdAt for the event itself, a type field identifying it, and a data object with the details. This example shows email.delivered, but Nuntly's webhook events cover the full email lifecycle and inbound messages, including email.sent, email.opened, email.clicked, email.bounced, email.complained, email.deliveryDelayed, and more.
The two IDs, both inside that payload. It carries two different identifiers and mixing them up breaks your handler. The root id (evt_...) identifies this one event. Retries of the same event carry the same value, which is what makes it the correct key to dedupe on. The data.id (em_...) identifies the email, and it repeats across every event in that email's lifecycle. Dedupe on data.id and you process email.delivered, then silently discard email.opened, email.clicked and email.bounced for the same message.
The signature headers. Proof that the request came from the provider and not an attacker. Nuntly sends a webhook-timestamp header (Unix milliseconds) and a webhook-signature header in the format t={unix_seconds},v0={signature}, where the signature is an HMAC-SHA256 hash of the timestamp and body. Your endpoint recomputes that hash with the signing secret and compares it, which is how you reject forged requests. The securing your webhook endpoint section shows the code.
How to create a webhook endpoint in Node.js
A webhook endpoint does three things in order: verify the signature, acknowledge fast, process the event. Here is a minimal handler with Next.js App Router:
// app/api/webhooks/nuntly/route.tsimport type { NextRequest } from 'next/server';export async function POST(req: NextRequest) {const payload = await req.text(); // raw body, needed for verificationconst signatureHeader = req.headers.get('webhook-signature') || '';if (!verifySignature(payload, signatureHeader, process.env.NUNTLY_WEBHOOK_SIGNING_SECRET!)) {return new Response('Invalid signature', { status: 401 });}const event = JSON.parse(payload);// Queue the event for background processing, then acknowledge.await queue.push(event);return new Response(JSON.stringify({ received: true }), { status: 200 });}
Two details matter more than they look:
Read the raw body. Signature verification hashes the exact bytes the provider sent. If your framework parses JSON before you can access the raw text (Express with a global express.json() middleware, for example), verification will fail. Use req.text() in Next.js or express.text({ type: 'application/json' }) on the webhook route in Express.
Respond quickly. The provider's delivery system treats a slow response as a failure and schedules a retry. If handling an event involves database writes, external API calls, or anything slow, push it to a queue (Redis, SQS, BullMQ) and return 200 right away. The webhook integration guide has complete Next.js and Express implementations, including the event routing.
Securing your webhook endpoint
An unverified webhook endpoint is an open door: anyone who discovers the URL can POST fake events into your system. A forged email.bounced event could suppress a real customer's address. Signature verification closes that door.
Signing secret: a shared secret the provider issues when you create the webhook. Nuntly shows it once, prefixed with whsec_. The provider uses it to compute an HMAC hash of every request, the webhook signature. If the hash you recompute with the same secret matches, the request is authentic and unmodified.
Nuntly signs every delivery with HMAC-SHA256. In a TypeScript or Node.js app you don't have to implement the check yourself. The @nuntly/sdk package ships a verifyWebhook helper that parses the header, enforces the timestamp tolerance, and returns the typed event:
import { verifyWebhook } from '@nuntly/sdk';// Throws WebhookVerificationError on a bad or expired signature.const event = await verifyWebhook(rawBody,req.headers.get('webhook-signature')!,process.env.NUNTLY_WEBHOOK_SIGNING_SECRET!,);
Under the hood, verification takes four steps. Here is the same logic by hand, which is what you would port to a language without an SDK:
import crypto from 'crypto';const TOLERANCE_SECONDS = 5 * 60;function verifySignature(payload: string, signatureHeader: string, secret: string): boolean {// 1. Strip the whsec_ prefix to get the raw keyconst rawKey = secret.replace(/^whsec_/, '');// 2. Parse the header: t=<seconds>,v0=<hex1>,v0=<hex2>const parts = signatureHeader.split(',');const timestamp = parts[0]!.replace('t=', '');const signatures = parts.slice(1).filter((s) => s.startsWith('v0=')).map((s) => s.slice(3));// 3. Reject timestamps outside the tolerance window (replay protection)const age = Math.floor(Date.now() / 1000) - Number(timestamp);if (Math.abs(age) > TOLERANCE_SECONDS) {return false;}// 4. Recompute the HMAC over "{timestamp}.{body}" and compareconst expected = crypto.createHmac('sha256', rawKey).update(`${timestamp}.${payload}`).digest('hex');return signatures.some((sig) =>sig.length === expected.length &&crypto.timingSafeEqual(Buffer.from(sig), Buffer.from(expected)),);}
Three security practices are baked into this code:
- Timing-safe comparison.
crypto.timingSafeEqualtakes the same time whether the signatures match or not, so an attacker can't guess the signature byte by byte from response timing. - Replay protection. The timestamp is part of the signed content, and the 5-minute window is enforced in both directions. Rejecting timestamps more than 5 minutes in the past stops an attacker from capturing a valid request and replaying it later. Rejecting timestamps more than 5 minutes in the future closes the same hole from the other side: without the absolute value, a far-future timestamp produces a negative age and sails straight through the check.
- Rotation support. During a secret rotation, Nuntly signs each delivery with both the current and previous secret, so the header can carry two signatures. Accepting any match lets you rotate secrets with zero downtime.
The header name and encoding vary by provider, but the shape is always the same: an HMAC in a header that you recompute with a shared secret and compare.
| Provider | Signature header | Algorithm |
|---|---|---|
| Stripe | Stripe-Signature: t=,v1= | HMAC-SHA256 (hex) |
| GitHub | X-Hub-Signature-256: sha256= | HMAC-SHA256 (hex) |
| Twilio | X-Twilio-Signature | HMAC-SHA1 (base64) |
| Nuntly | webhook-signature: t=,v0= | HMAC-SHA256 (hex) |
Learn to verify one and you can verify any of them.
Never skip verification, even in development. It's the only thing standing between your event handlers and arbitrary input from the internet.
With Nuntly, the signing secret and the signature format above are generated when you create a webhook, and verifyWebhook does the check in one call. Create a free account to try it against a real endpoint.
Retries, idempotency, and reliability
Your endpoint will go down. A deploy restarts your servers, a database migration locks a table, an outage takes out a region. What happens to the events sent during that window depends entirely on the provider's retry policy, and this is where webhook implementations differ the most.
Nuntly retries a failed delivery 10 more times after the first attempt, with exponential backoff starting at 30 seconds and doubling each time. A delivery counts as failed when your endpoint returns an error status or takes longer than 5 seconds to respond. Because the interval keeps doubling, those 11 attempts stretch over roughly 8 hours, so a deploy window or a short outage resolves itself without you doing anything. Every attempt is recorded with its response code, and you can replay it from the dashboard or API at any point, including after the automatic retries are exhausted. A window of downtime costs you a delay, not the events.
Retries create a new requirement on your side: the same event can arrive more than once. If your endpoint responds slowly, the provider may retry an event you already processed. Your handler must be idempotent.
Idempotent: an operation that produces the same result whether it runs once or ten times. The concept comes from the HTTP specification itself (RFC 9110, section 9.2.2).
The simplest implementation that holds up under concurrency is a unique constraint on the root event ID, the evt_... value, not the em_... email ID nested under data:
async function handleEvent(event: { id: string; type: string; data: Record<string, unknown> }) {// INSERT ... ON CONFLICT (id) DO NOTHINGconst inserted = await db.processedEvents.insertIfNotExists({id: event.id,processedAt: new Date(),});if (!inserted) {return; // duplicate delivery, already handled}// Process the event}
The database enforces the constraint even when two retries arrive concurrently: only one insert wins. The same principle applies in the other direction when you call an email API, which is why Nuntly supports idempotency keys on the sending side too.
Monitoring your webhook endpoint
A webhook endpoint fails quietly. The provider keeps sending, your handler keeps returning 500, and nothing in your own product tells you. Three signals are worth watching:
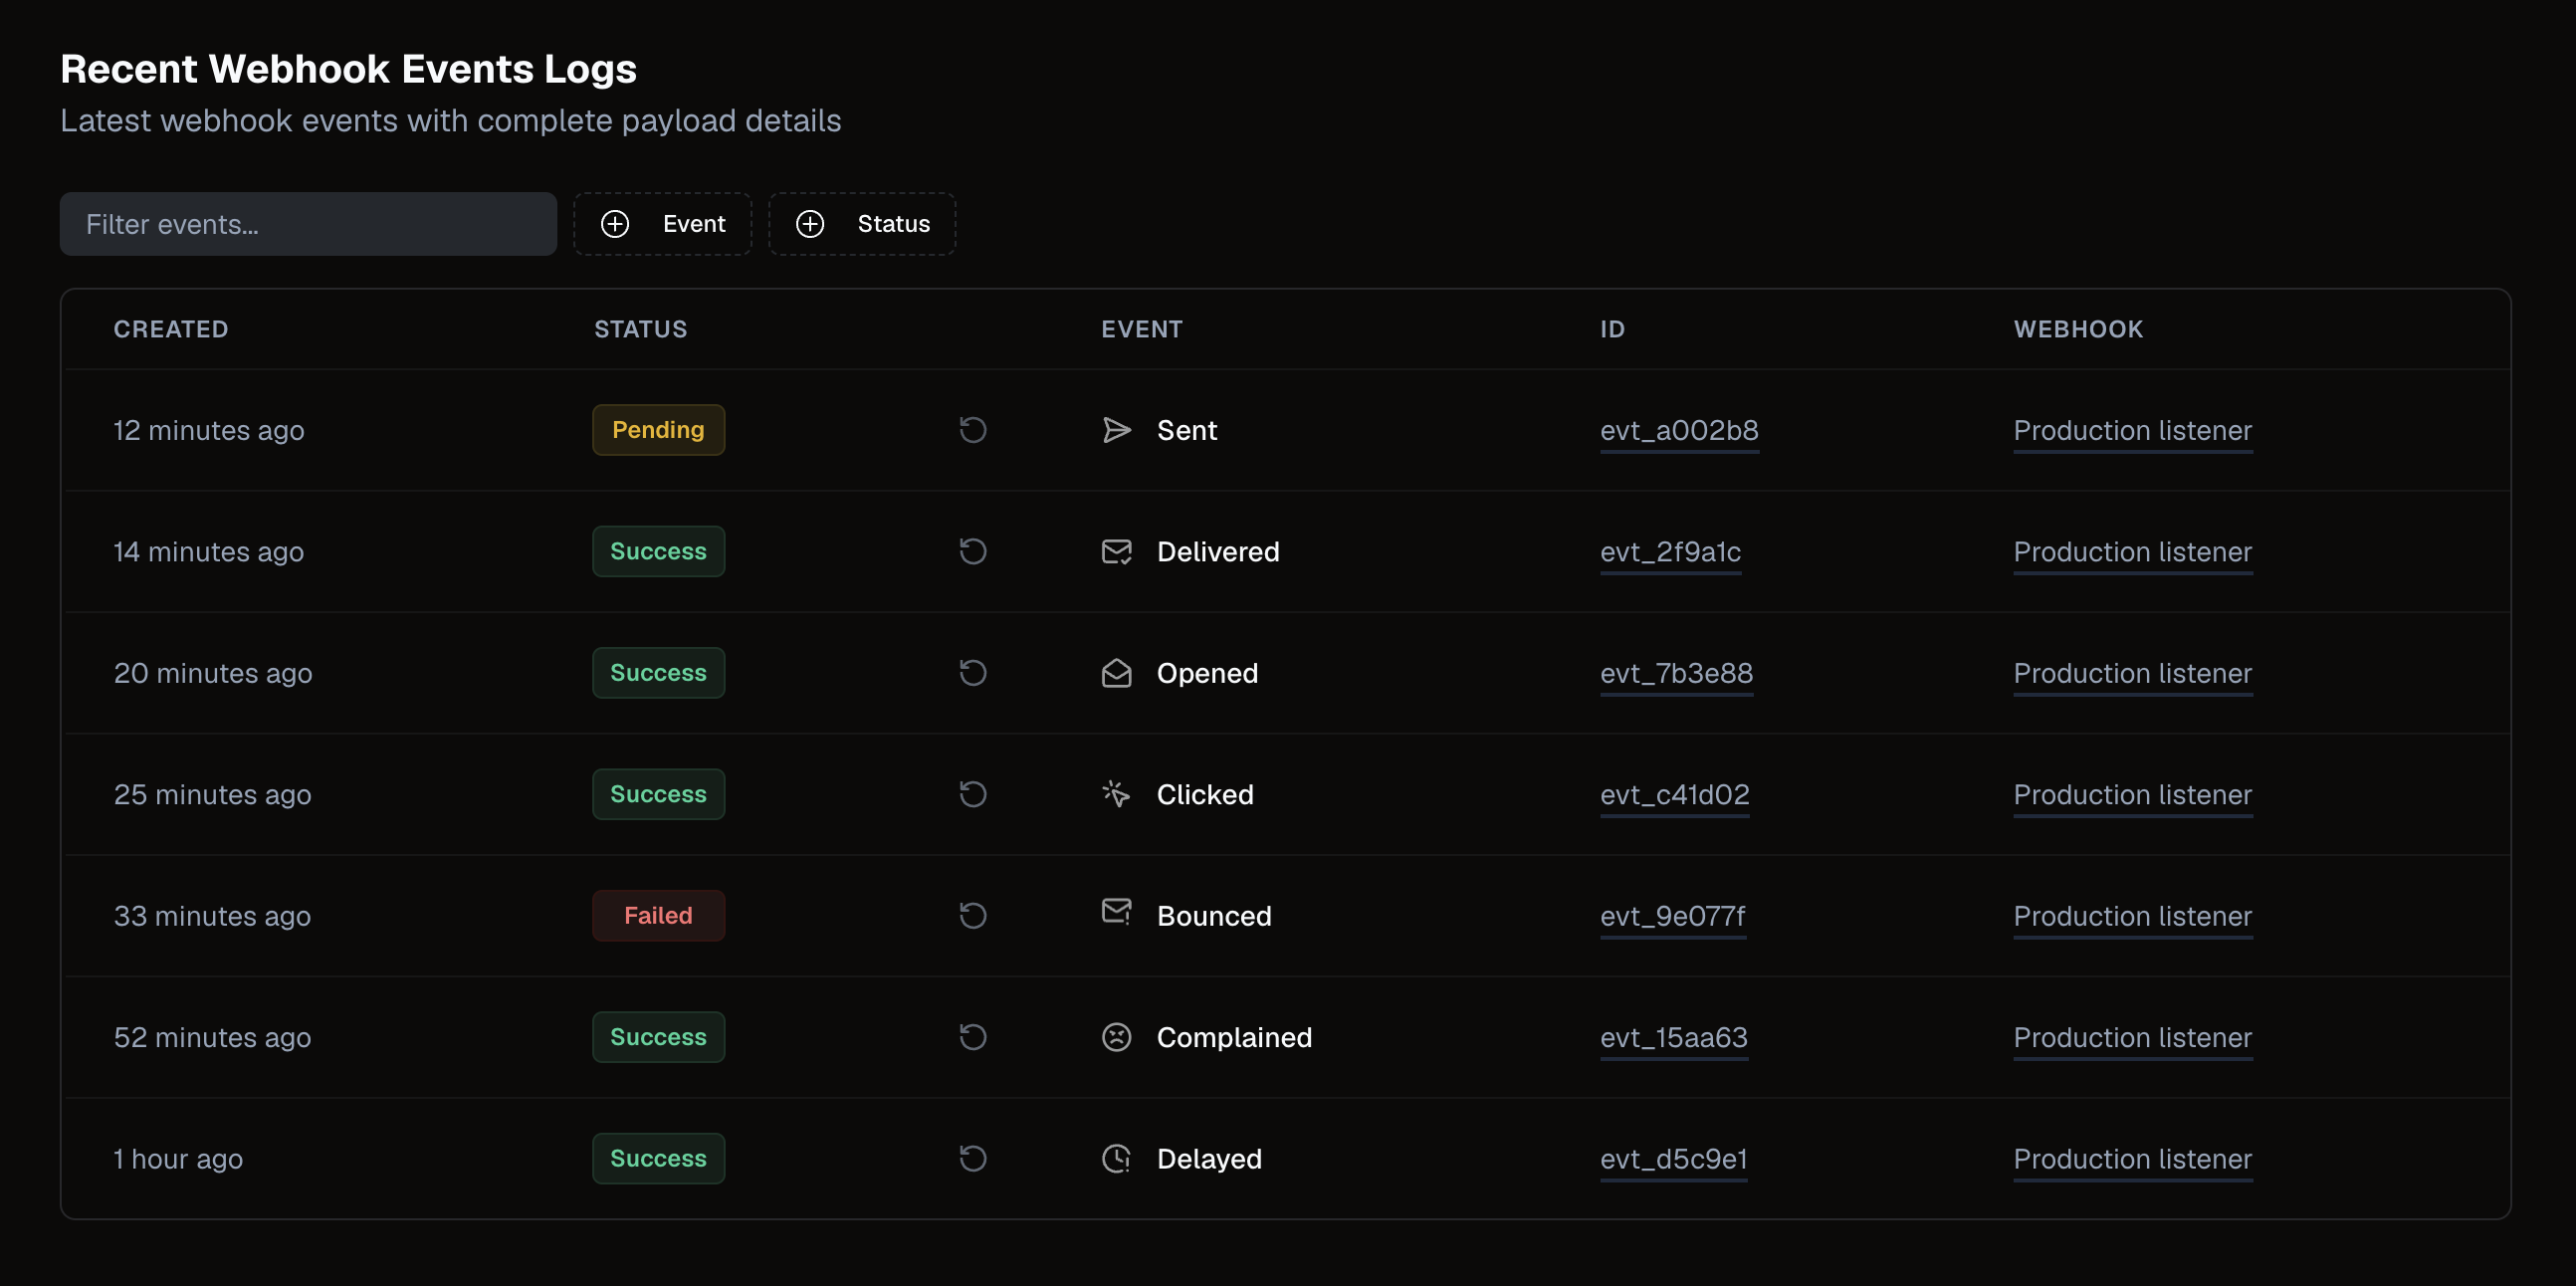
Every delivery to your endpoint, with its status, in the Nuntly dashboard
- Delivery success rate. The share of deliveries your endpoint answered with a
2xx. A drop points to a bug in your handler or an outage on your side, not the provider's. - Response time. If your endpoint drifts past the provider's timeout, deliveries start failing and retrying even when your logic is correct. Track the p95, not the average.
- Gaps. Compare events sent against events received. A gap means deliveries are being dropped somewhere between the two.
When a delivery does fail, you need the raw attempt to debug it: the exact payload, the headers, the response your endpoint sent back, and the timestamp. Nuntly's webhooks observability dashboard records every delivery attempt with all of that, so you diagnose a failure from evidence instead of guessing. It is also where you replay the events you missed once the endpoint is healthy again.
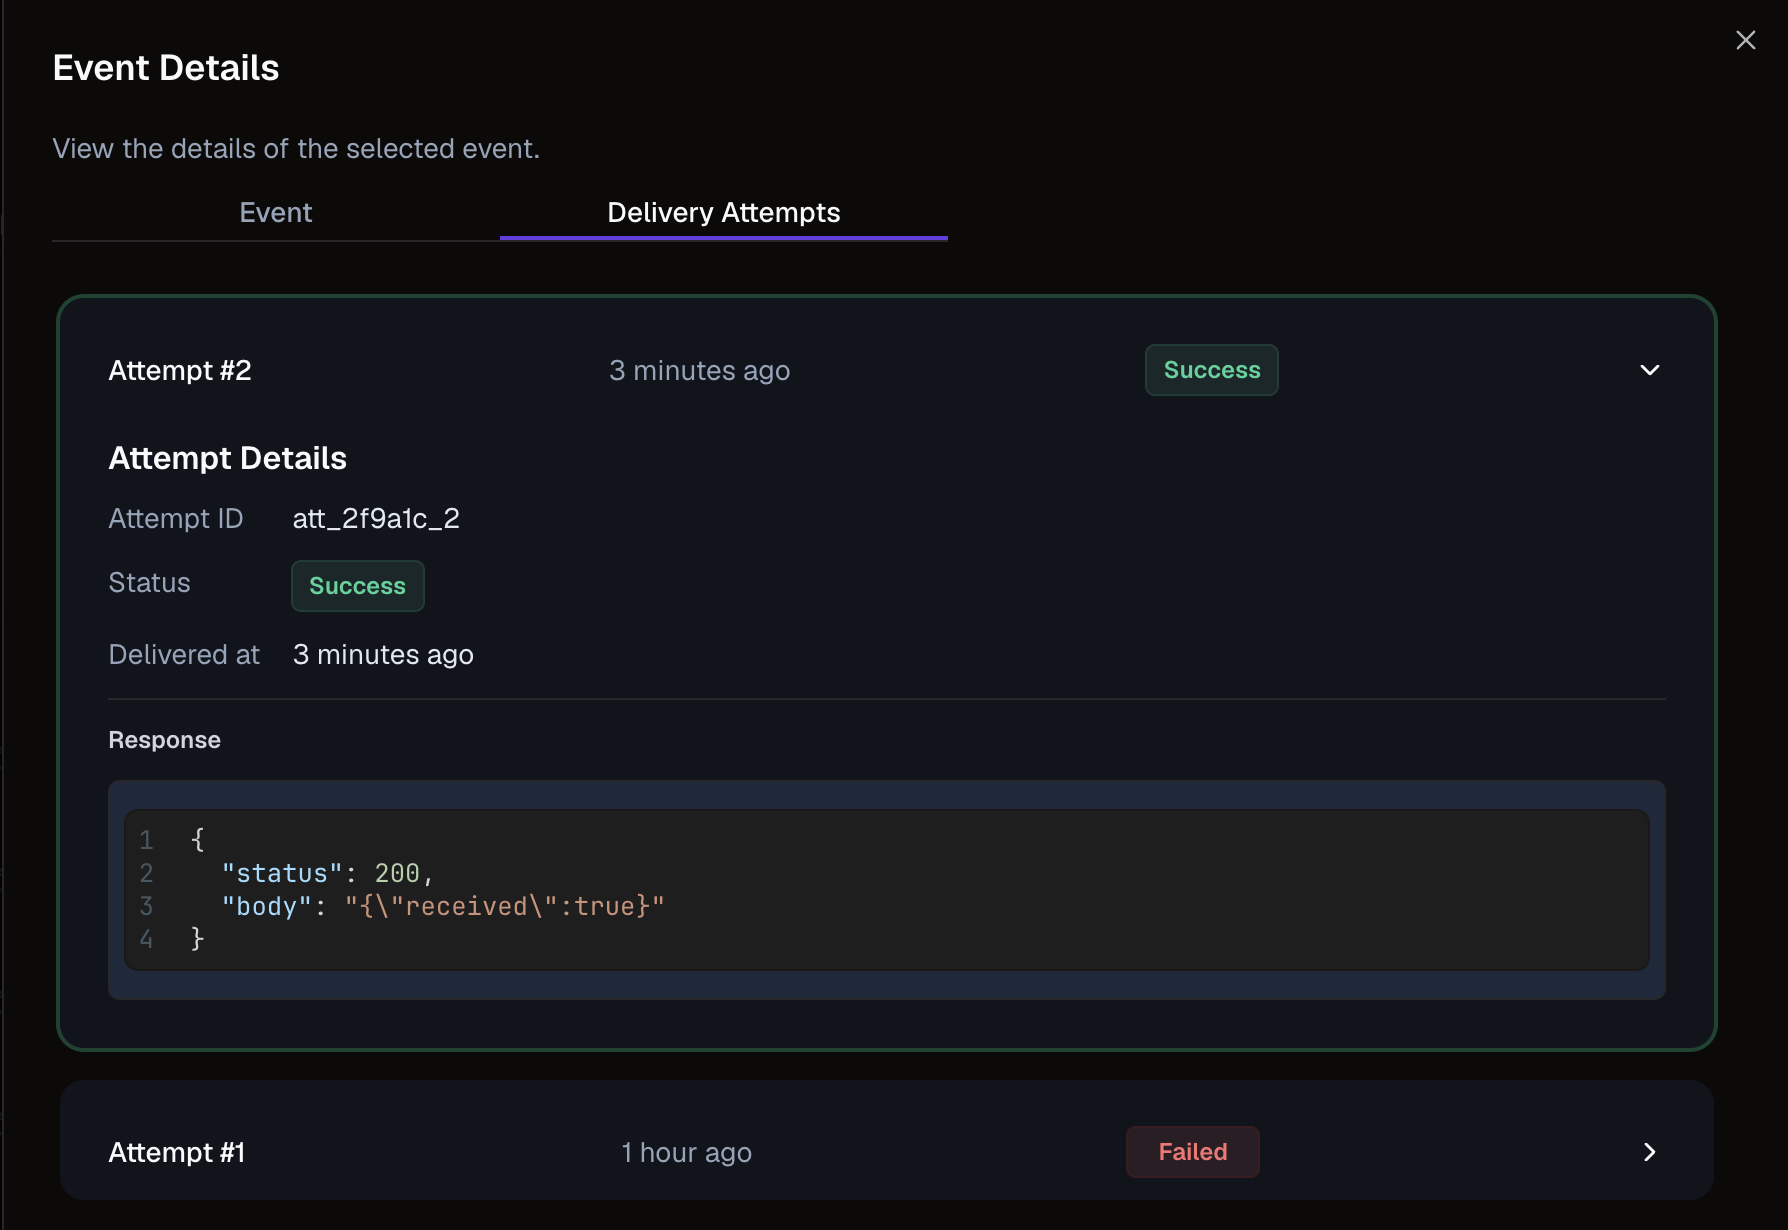
Each delivery attempt with its response body, so a failure is a fact, not a guess
Build your first webhook endpoint
The request has its four parts. Your handler has four requirements of its own: be reachable at a public HTTPS URL, verify the signature on every request, answer with a fast 2xx, and process each event idempotently. Get those four right and webhooks become the most reliable way to keep your application in sync with events you don't control.
Nuntly gives you the provider side out of the box: signed deliveries, 10 automatic retries with exponential backoff, a logged response code for every attempt, and event replay for anything you miss. Create a webhook from the dashboard or SDK, point it at your endpoint, and follow the integration guide to go live.
Ship emails, not infrastructure
Free plan available. No credit card required.
Start sending freeWebhook endpoint FAQ
Is a webhook endpoint the same as a webhook?
Not quite. The webhook is the whole mechanism: the provider-side configuration, the event, and the HTTP delivery. The webhook endpoint is your half of it: the URL and handler that receive the delivery. You configure a webhook; you build a webhook endpoint.
Does a webhook endpoint need to be publicly accessible?
Yes. The provider's servers must reach your URL over the public internet, via HTTPS. For local development, tunneling tools like ngrok or Cloudflare Tunnel expose your local server through a temporary public URL.
What should a webhook endpoint return?
A 2xx status code, quickly, once the signature is verified. Anything else (a 4xx, a 5xx, or a timeout) tells the provider the delivery failed and triggers a retry. Return 401 for signature failures: the forged request never reaches your handlers. And if the failure comes from a misconfigured secret on your side, the provider's retries and delivery logs buy you time to fix it without losing events.